


Wildcrafting is the process in which one forages for plants or food.
When I first started learning about herbs, I knew nothing of harvesting my own plants, except for plantain, that is. I mostly ordered herbs online or bought them from my local health food store.
It wasn’t until I met a couple of people that lived in my area and took me on some plant walks that I began to love wildcrafting. I had no idea that so many medicinal plants grew in my area and that I could actually learn to go out, see them, correctly harvest them, and then put them to work keeping me and my family well all year round.
Honestly, I think my experiences with wildcrafting really helped to awaken the herbalist in me. Since then I’ve begun to wildcraft herbs on a regular basis. I’m still learning… still growing… still harvesting… and having tons of fun as I go.
Why Would Someone Want To Forage For Herbs
There are many reasons why a person would be interested in going out and hunting for herbs.
For me, it’s because I’m most interested in learning about the plants that grow in the area I live in, I want to be a bit more self-sufficient which means being able to identify and harvest plants in the wild, and I feel it connects me with herbs more which helps me to be more thankful for the gift of herbs.
Other reasons are that it helps strengthen the plants and the areas they live in, which should be an important reason for anyone interested in using herbs, wildcrafted herbs are free, and herbs that grow in the wild tend to have stronger medicine in them than cultivated or farmed herbs.
Before Wildcrafting
Wildcrafting is a learned trade, and it can be a lot of work. Before getting started, it’s a good idea to keep the following things in mind.
Plant Identification
First off, knowing how to identify the plant you’re searching for is a must as many plants look alike. I’ll never forget the story of Linda Runyon’s son collecting what he thought was queen Anne’s lace when in fact it was the look-a-like, poisonous hemlock. Field guides will help you learn to identify herbs as well as online resources like the YouTube channel, Eat The Weeds, Herb Mentor, and the Herbal Academy of New England’s new membership site, The Herbarium.
Endangered Plants
Another thing to keep in mind when it comes to wildcrafting is first checking to see if the herb you’re looking for is on the endangered species list. Rosemary Gladstar started United Plant Savers as a way of bringing safety and awareness to people about overharvesting plants.
This is a big deal because if plants are endangered and people continue to harvest them, our options for natural healthcare are very limited. If you find out the plant you’re looking for is on this endangered list, it’s best to purchase it from a cultivated source like Bulk Herb Store or Mountain Rose Herbs.
Growing Area
It’s also important to know where the plants you’re looking to grow and what a healthy and unhealthy habitat is.
Most wildcrafters recommend staying at least 100 feet from anything that’s been sprayed or has frequent contact with chemicals, such as road ways, train tracks, commercial buildings, flower gardens, etc. This ensures that the herbs you are collecting are strong, healthy, and non-toxic.
Know What and How Much You Need
Before setting off to collect herbs, it’s a good idea to know how you plan to use what you’re searching for. This helps to gauge how much of it you need to collect.
Another thing to be aware of is the time of the year and what part of the plant is available for harvest. For example, dandelion roots are typically harvested in spring or fall, leaves are harvested in spring, and the flowers are harvested spring through autumn.
Also know that different seasons bring about different constituents in plants. Back to the dandelion example. Fall roots contain higher levels of inulin (a prebiotic) than spring roots so if you’re looking for inulin-rich roots, a fall dandelion harvest would be better than a spring harvest.
Ask Permission
Finally, it’s important to get permission to harvest from other people’s land. Not only do you not want to break any trespassing laws, but you want to make sure you’re in a safe area — not to mention it’s the respectful thing to do. Most people don’t mind at all.
Wildcrafting Tools
Anytime you are out collecting any kind of plants, you’ll want to have some of the following tools with you to help with harvesting.
- bags or baskets
- pruning shears and scissors
- a strong stick for digging (a small pitchfork works well too)
- paper
- pen
- a field guide (these are my favorites)
- a natural bug spray (for summer and autumn foraging)
You’ll also want to make sure that you have appropriate clothes on when searching for plants. For me, that’s long pants (as stinging nettle and poison ivy are everywhere in these mountains), a thick coat (to keep the thorns and briers from cutting you), hiking boots (for climbing mountains) and sometimes mud boots (for wading in steams for elderflowers and berries), and good gloves.
How To Wildcraft Herbs
When it comes to the how-to of wildcrafting herbs, it’s important to know which part of the plant is ready to harvest since different parts of plants are harvested at different times of the year. This also includes knowing the actual steps taken to harvest the plant as well as how to harvest in a sustainable way.
I’m not going to go into much detail here because this varies for each plant, but the main things to keep in mind are a plant’s growing seasons (buds – spring, flowers – spring/summer, leaves – year-round, roots – spring/fall, berries – year round when ripe, bark – year-round), pinching off flower heads or cutting plants with shears/scissors instead of breaking and tearing at the plant, gently digging roots out with a stick or mini pitchfork instead of using a shovel, and not taking all of a plant from one growing area (general rule of thumb is to take 1/4 of what’s growing).
What To Do With Herbs After You’ve Collected Them
Once you’ve collected your plants and headed home, what are you to do next? Well, preserve them of course!
When it comes to preserving fresh herbs you have a couple of options. You can either immediately tincture them fresh or you can dry them for later use. I’m not going to go into detail about tincturing because I’ll be detailing that process in a later post, but I will talk about how to dry herbs.
Drying fresh herbs isn’t too difficult so I’ll detail the steps below.
One option you have is hanging herbs out to dry.

- Wash leaves and roots (scrubbing, if needed) in clean water. When collecting flowers and berries, first place these herbs on a white sheet outdoors for 1-2 hours so bugs will jump off, as these are more difficult to clean with water without adding too much moisture to them.
- Shake leaves and roots to dry or gently dry with a towel. (These towels are my favorite – so absorbent!)
- Bundle herbs in small bunches and secure ends with rubber bands or twist ties. Roots can be bundled or laid out on a screen or cookie-cooling tray lined with cheesecloth. Some people love these collapsable herb drying racks.
- Hang bunches of herbs or set screens/trays in a warm place with good airflow. Two things to keep in mind here. You want the temperature to be above 70 degrees Fahrenheit, but not more than 120 degrees Fahrenheit since you want the herbs to dry, not cook. Next, you need that place to be dry, not moist. If your herbs stay moist they will mold.
- Check herbs daily to make sure they’re drying well. Check to make sure they are separated and not sticking together, as this can lead to mold.
- When herbs are dry, they will crunch or break like a dry cracker. If they bend or are difficult to break then they aren’t fully dry. Leave them longer.
Another option for drying herbs is to dry them in an oven.
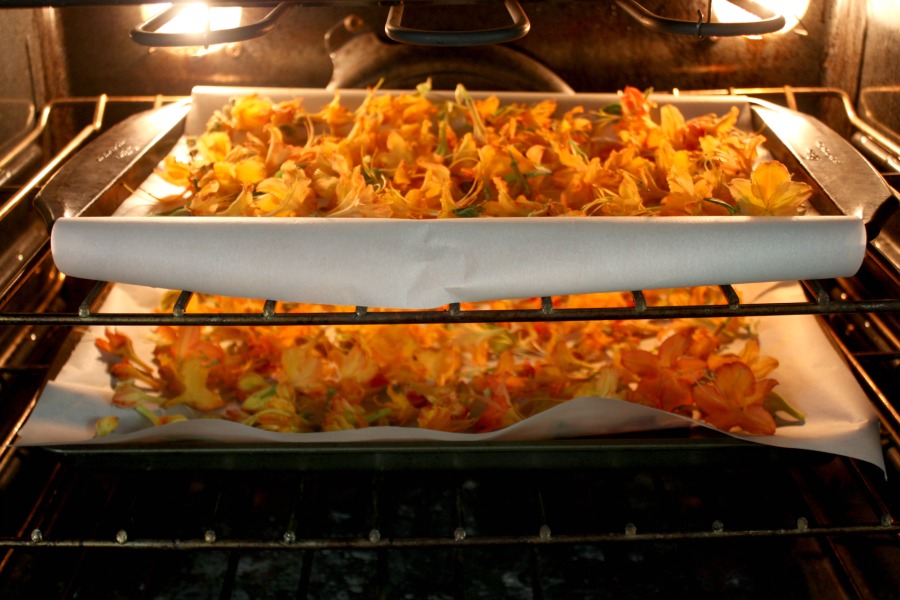
- Simply preheat your oven to its lowest temperature.
- While it’s heating up, place your herbs on a cookie sheet (lined with parchment paper, if you want). Make sure they’re spread out so they dry evenly.
- Once the oven is heated, turn it off, and place your cookie sheet inside.
- Wait 2-3 hours, take herbs out, flip them over, and repeat the process again. The length of time this takes will vary depending on the herb.
You can also use a dehydrator to dry herbs.
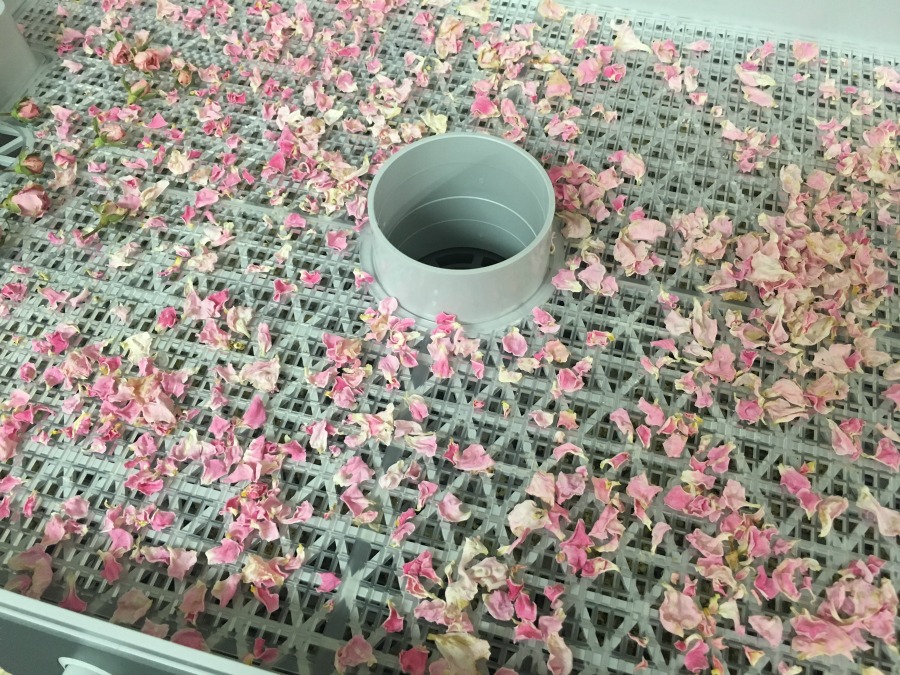
- Simply lay your herbs out in thin layers on the trays
- Put trays back in, and set your temperature. I usually keep mine at 100 degrees Fahrenheit.
- Set your timer for 5 hours or so. When time is up, check your herbs to see if they’re dry (crispy like a cracker). If you find some herbs aren’t dry simply do it again.
No matter which drying method you choose, the point is to slowly dry your herbs at an ideal temperature in order to preserve their constituents.
Once your herbs are dry, store them in labeled jars or bags to use when you need them.
And that’s it! That’s how you can wildcraft and preserve your herbs for future use!
Herb Folk
Herb Folk is a low-cost membership that provides exclusive monthly content centered around seasonal herbalism and lifestyle practices that educate and inspire others to slow down and let the cycles of nature guide their days. Inside you’ll find articles, videos, audio, recipes, and downloads all centered around seasonal herbalism and lifestyle. In addition to monthly seasonal herbal content, you will also find quarterly creative projects, and an exclusive community group where members can connect and learn from one another in real-time. Learn more about Herb Folk and become a member today!
Really excellent article. There is so much to learn about herbs, and you are taking people through it one step at a time. Well done.
Thanks so much Viki! Having a foundation is so important!
I love going on herb walks! Identifying plants in person teaches me a lot more than pictures in a book.
I agree! I’ve not been on one for a while so I can’t wait for warmer weather!
Wonderful posts! Quick question, what guide or book do you recommend for referance for the ailment.
So far all I see are plant guides, I would like to have an ailment book that guides you to the herbs needed.
For instance….I have a bruse or stuffy nose, I referance this ailment it sends me to the medicine garden to gather appropriate herbs.
Thanks!
Btw..if you are interested in workshops I would love to host! Colorado mountains! Tons of wild medicines!
Two of my favorite herbal books that give you herbs and remedies for ailments are Herbal Recipes for Vibrant Health by Rosemary Gladstar and The Green Pharmacy by Dr. James A. Duke.
As for workshops, I’d totally LOVE to do that sometime, but right now… with 4 little ones, it’s kind of hard to plan that sort of thing. Thanks for the offer though. I’ll totally keep you in mind. I’d love to visit Colorado!
[…] by primitive shelters. Adults and children understood plants, could identify trees and were able to wildcraft herbs for food and medicine. For thousands of years everyone, including children, carried basic tools and […]
5